 Pin it
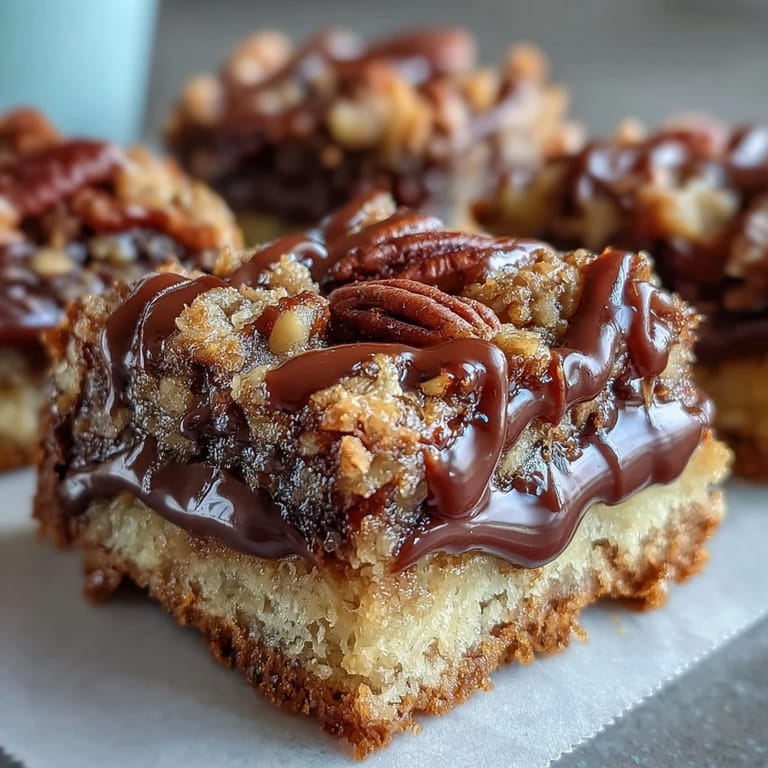
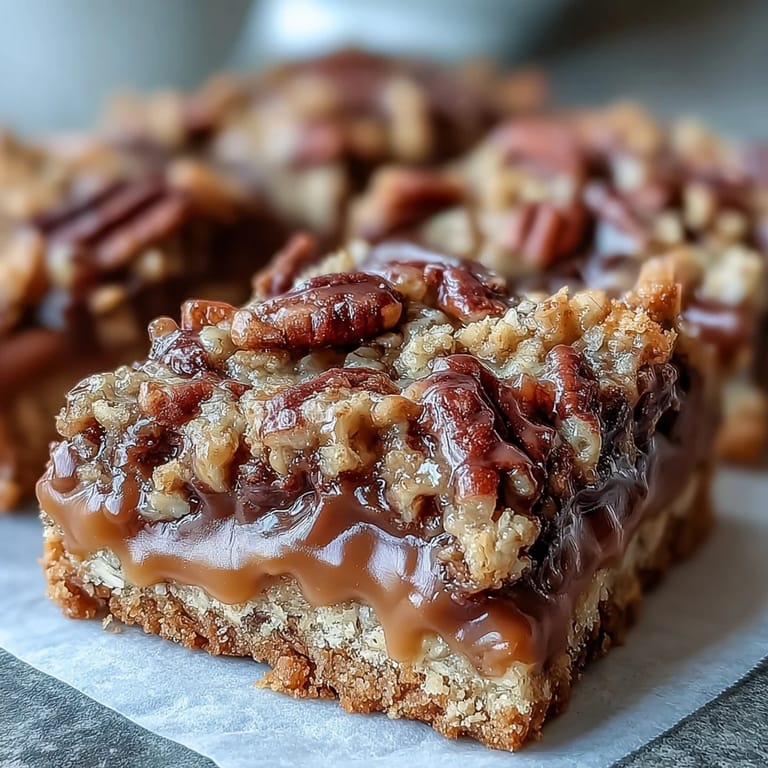
 My oven timer had just buzzed when my neighbor knocked, drawn by the smell of toasted pecans drifting through the hallway. I wasn't planning to share, but one look at those golden crumb-topped squares and I knew I'd be slicing them into smaller pieces. These turtle bars have a way of turning a quiet Tuesday into an impromptu gathering. The chocolate was still glossy, the caramel barely set, and we ate them with our fingers straight from the pan. Sometimes the best recipes are the ones you can't wait to cool.
I made my first batch for a bake sale and watched them vanish in under ten minutes. A woman bought three, then came back asking if I had more hidden somewhere. The combination of chewy oats, crunchy pecans, and that molten caramel layer hits every craving at once. I started doubling the recipe after that, because one pan never seems like enough. They've become my go-to whenever I need something that feels special but doesn't require chef-level skills.
Ingredients
- All-purpose flour: Forms the base structure of your crust and topping, giving just enough body without making the bars cakey or dry.
- Rolled oats: These add that signature chewiness and nutty flavor, toast them lightly if you want even deeper warmth.
- Brown sugar: Brings moisture and a hint of molasses that plays beautifully with caramel, don't swap it for all white sugar.
- Granulated sugar: Balances the brown sugar's richness and helps the topping crisp up in the oven.
- Unsalted butter, melted: Binds everything together and creates those irresistible golden edges, make sure it's fully melted for even mixing.
- Salt: Just a pinch sharpens all the sweet flavors and keeps the bars from tasting flat.
- Baking soda: Gives a slight lift to the crumb topping so it doesn't bake into a hard shell.
- Semi-sweet chocolate chips: They melt into puddles of chocolate that seep into every crevice, use good quality chips for the best flavor.
- Chopped pecans: Toasted pecans add crunch and that classic turtle flavor, but walnuts or almonds work if that's what you have.
- Caramel sauce: Store-bought is perfectly fine here, just choose one that's thick and not too runny.
- Heavy cream: Thins the caramel just enough to pour smoothly without making it soupy, whole milk won't give you the same richness.
Tired of Takeout? 🥡
Get 10 meals you can make faster than delivery arrives. Seriously.
One email. No spam. Unsubscribe anytime.
Instructions
- Prep Your Pan:
- Preheat your oven to 350°F and grease a 9x9-inch pan generously with butter, or line it with parchment for easy lifting later. Don't skip this step or you'll be chiseling bars out with a spatula.
- Mix the Crumb Base:
- Combine flour, oats, both sugars, melted butter, salt, and baking soda in a large bowl until the mixture looks like damp sand. It should clump when you squeeze it but still feel crumbly.
- Form the Crust:
- Set aside one cup of the crumb mixture in a small bowl for topping, then press the rest firmly into the bottom of your pan. Use the bottom of a measuring cup to get it really even and compact.
- Bake the Base:
- Slide the pan into the oven for 10 minutes until the edges just start to turn golden. This step sets the crust so it doesn't get soggy under all that caramel.
- Warm the Caramel:
- While the crust bakes, heat caramel sauce and heavy cream in a small saucepan over medium-low, stirring constantly until smooth and pourable. Keep it warm but not bubbling.
- Layer Chocolate and Pecans:
- Pull the crust from the oven and immediately scatter chocolate chips over the hot surface, then sprinkle pecans on top. The heat will start melting the chocolate right away.
- Pour the Caramel:
- Drizzle the warm caramel evenly over everything, working quickly so it doesn't set before you spread it. A spoon helps coax it into the corners.
- Add the Crumb Topping:
- Sprinkle that reserved cup of crumb mixture over the caramel in an even layer, don't press it down. It'll bake into a gorgeous golden cap.
- Finish Baking:
- Return the pan to the oven for 15 to 20 minutes until the topping turns deeply golden. The edges might bubble a little, that's perfect.
- Cool and Slice:
- Let the bars cool completely in the pan on a wire rack, this takes about 30 minutes and lets the caramel set properly. Cut into 16 squares with a sharp knife, wiping it between cuts for clean edges.
 Pin it
 The first time I brought these to a potluck, someone asked if I owned a candy shop. I laughed and said no, just a decent oven and a love for anything involving caramel. By the end of the night, three people had tucked my recipe into their phones. There's something about a dessert that tastes this indulgent but comes together without fuss that makes people feel like they've been let in on a secret.
Choosing Your Caramel
I've tested this recipe with jarred caramel, squeeze bottles, and homemade batches, and honestly, a good store-bought caramel works beautifully. Look for one that lists cream or butter near the top of the ingredients, those have better flavor and texture. If you're feeling ambitious, homemade caramel adds a deeper richness, but it's not necessary for incredible results. Just make sure whatever you use is thick enough to cling to a spoon, watery caramel will seep through the crust and make the bars soggy.
Storage and Serving
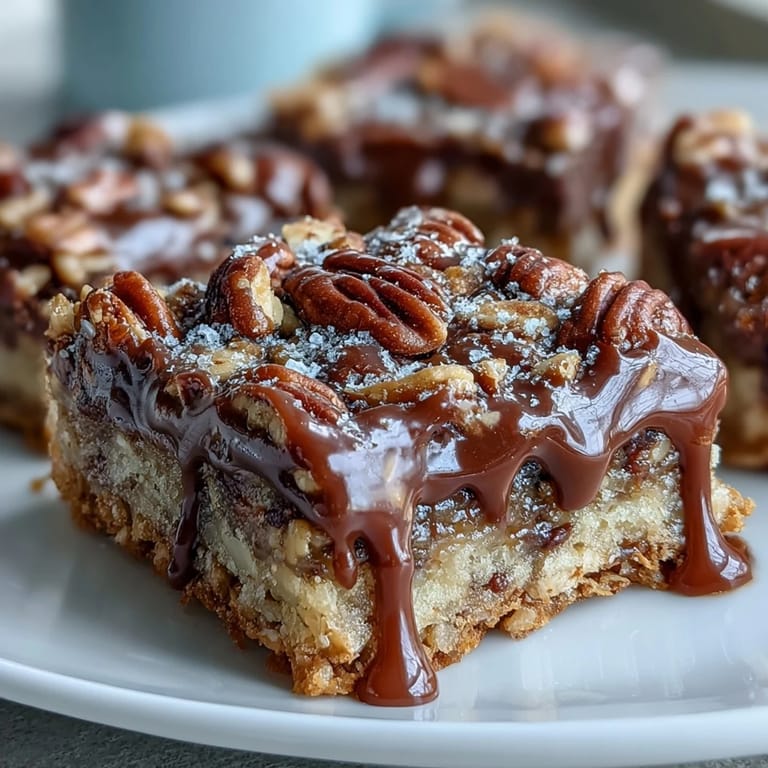
These bars keep for up to a week in an airtight container at room temperature, though they rarely last that long in my house. If you stack them, slip parchment between the layers so they don't stick together. For a fancy finish, drizzle melted chocolate over the cooled bars in thin zigzags, it hardens quickly and makes them look bakery-level. I've also tucked them into tins for holiday gifts, and they travel beautifully without falling apart.
Flavor Twists
Once you've made these a few times, they become a canvas for all kinds of variations. Swap pecans for walnuts or toasted almonds, or mix in a handful of toffee bits with the chocolate chips for extra crunch. A pinch of flaky sea salt sprinkled over the caramel before you add the crumb topping turns these into salted caramel bars that people will beg you to make again. I've even stirred a teaspoon of espresso powder into the crumb mixture for a subtle mocha vibe that pairs perfectly with the chocolate.
- Try dark chocolate chips instead of semi-sweet if you want a less sugary bite.
- Add a quarter teaspoon of cinnamon to the crumb mixture for a warm, spiced undertone.
- Press a whole pecan half into each square before baking for a classic turtle candy look.
 Pin it
 These bars have earned a permanent spot in my dessert rotation, right next to brownies and cookies that never fail. They're proof that you don't need complicated techniques to make something people remember.
Recipe FAQs
- → How should I store these bars?
Keep in an airtight container at room temperature for up to one week. The layers stay moist and chewy, while the crumb topping remains crisp.
- → Can I make the caramel sauce from scratch?
Absolutely. Simmer sugar, butter, and heavy cream together until amber-colored, stirring constantly. Let cool slightly before combining with the additional cream.
- → What nuts work best as a pecan substitute?
Walnuts offer a similar buttery richness, while almonds provide a pleasant crunch. Both complement the chocolate-caramel layers beautifully.
- → Why must the crust cool before adding toppings?
A warm crust helps melt the chocolate chips slightly, creating pockets that bond with the caramel. This ensures the layers hold together when cut.
- → Can I freeze these bars?
Yes, wrap individual squares in plastic and freeze for up to three months. Thaw at room temperature for the best chewy texture.
- → How do I know when they're finished baking?
The crumb topping should turn golden brown, and the caramel layer will bubble gently around the edges. Allow to cool completely before slicing.